In this tutorial, we will show you how to work with swing border layout using BorderLayout class.
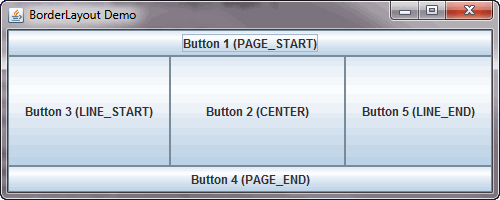
Here is the screenshot of the demo application using BorderLayout.
The BorderLayout divides the container into five areas which include: PAGE_START, PAGE_END, LINE_START, CENTER, and LINE_END.
You can use the constants of BorderLayout class to indicate the area where you want to place a component. If you enlarge the window, you can see that the center area take up as much of space as possible and the other areas only expand to fill available space.
You can set the horizontal and vertical gap between components by using methods setHgap() and setVgap().
Here is the source code of the demo application:
package borderlayoutdemo;
import java.awt.*;
import javax.swing.*;
public class Main {
public static void main(String[] args) {
JFrame frame = new JFrame("BorderLayout Demo");
JButton btn1 = new JButton("Button 1 (PAGE_START)");
JButton btn2 = new JButton("Button 2 (CENTER)");
JButton btn3 = new JButton("Button 3 (LINE_START)");
JButton btn4 = new JButton("Button 4 (PAGE_END)");
JButton btn5 = new JButton("Button 5 (LINE_END)");
JPanel panel = new JPanel(new BorderLayout());
panel.add(btn1, BorderLayout.PAGE_START);
panel.add(btn2, BorderLayout.CENTER);
panel.add(btn3, BorderLayout.LINE_START);
panel.add(btn4, BorderLayout.PAGE_END);
panel.add(btn5, BorderLayout.LINE_END);
frame.setDefaultCloseOperation(JFrame.EXIT_ON_CLOSE);
frame.setSize(500,200);
frame.getContentPane().add(panel);
frame.setVisible(true);
}
}Code language: JavaScript (javascript)